Hello IOT-Kit, Introduction By Example
February 12, 2018 at 01:54 AM | categories: iotkit, python, iot, C++, definitions, iotoy | View CommentsIOT-Kit is a toolkit for enabling the creation of IOT devices, by people who can make simple arduino based devices. Rather than waffle on about why, how, etc, I think the best way of explaining what this does, is by example.
Specifically, this post covers:
- Suppose you can make little arduino based robots
- Suppose you want to remote control your robots over the local network, trivially from something like python. (Really over HTTP in fact!)
What do you as a device maker need to do to make this happen?
IOT-Kit - Make your Arduino Device an IOT Device, easily
So the really short version is this: you can make a simple robot, but you want to make it usable as an IOT device too. You don't want to build the entire stack. You don't want to build everything yourself.
You want your users to be able to type something like this program and have it search for the robot on the network, and have it control the robot.
from iotoy.local import simplebot
import time
import random

simplebot.lights = 0
while True:
    choice = random.choice(("forward", "backward", "left", "right", "blink", "stop"))
    if choice == "forward":
        simplebot.forward()
    if choice == "backward":
        simplebot.backward()
    if choice == "left":
        simplebot.left()
    if choice == "right":
        simplebot.right()
    if choice == "blink":
        for i in range(3):
            simplebot.lights = 1
            time.sleep(0.5)
            simplebot.lights = 0
            time.sleep(0.5)
    if choice == "stop":
        simplebot.stop()

    time.sleep(5)
NOTE: While this is python, this actually maps to a bunch of deterministic http web calls, and actually can be written in any langauge. iotoy/iotkit just provides a bunch of convenience functions to do these calls in a way that also maps cleanly to python. (It also would map cleanly in javascript, ruby, perl, etc)
How do we get to this?
Building the Robot - Hardware
These is the easy part. We could use a DAGU mini-driver. This can control a number of servos and also provides serial access over plain old hardware serial bluetooth.
Building the Robot - Software, No IOT
If we were just controlling the robot without any remote control, we could use Pyxie to program this. The Pyxie program you might use could look like this:
#include <Servo.h>

leftwheel = Servo()
rightwheel = Servo()

headlights_led_pin = 13
leftwheel_pin = 2
rightwheel_pin = 3

pinMode(headlights_led_pin, OUTPUT)
leftwheel.attach(leftwheel_pin)
rightwheel.attach(rightwheel_pin)

leftwheel.write(90)
rightwheel.write(90)

while True:
    leftwheel.write(180)
    rightwheel.write(180)
    delay(500)

    leftwheel.write(180)
    rightwheel.write(0)
    delay(500)

    leftwheel.write(0)
    rightwheel.write(0)
    delay(500)

    leftwheel.write(0)
    rightwheel.write(180)
    delay(500)

    leftwheel.write(90)
    rightwheel.write(90)
    delay(500)

    digitalWrite(headlights_led_pin, HIGH)
    delay(1000)
    digitalWrite(headlights_led_pin, LOW)
    delay(1000)
This program assume 2 continuous rotation servos, where the centre point 90 means stationary, 0 means full reverse, and 180 means full forward.
What this program means is "forward, right, backward, left, stop, blink headlights".
Pyxie generates C++ code, which we can use as a starting point for our code:
#include <Servo.h>

#include "iterators.cpp"

void setup() {
    int headlights_led_pin;
    Servo leftwheel;
    int leftwheel_pin;
    Servo rightwheel;
    int rightwheel_pin;

    leftwheel = Servo();
    rightwheel = Servo();
    headlights_led_pin = 13;
    leftwheel_pin = 2;
    rightwheel_pin = 3;
    pinMode(headlights_led_pin, OUTPUT);
    (leftwheel).attach(leftwheel_pin);
    (rightwheel).attach(rightwheel_pin);
    (leftwheel).write(90);
    (rightwheel).write(90);
    while (true) {
        (leftwheel).write(180);
        (rightwheel).write(180);
        delay(500);
        (leftwheel).write(180);
        (rightwheel).write(0);
        delay(500);
        (leftwheel).write(0);
        (rightwheel).write(0);
        delay(500);
        (leftwheel).write(0);
        (rightwheel).write(180);
        delay(500);
        (leftwheel).write(90);
        (rightwheel).write(90);
        delay(500);
        digitalWrite(headlights_led_pin, HIGH);
        delay(1000);
        digitalWrite(headlights_led_pin, LOW);
        delay(1000);
    };
}

void loop() {
}
Making a simple device abstraction layer for our device.
A device abstraction layer just means creating names for the key functionality we care about. At some point, pyxie will help here, but pyxie is currently very simple and can't create functions, so we take the C++ code we have so far and work from there.
The interators in the iterators.cpp file are not used, so we can ditch that too.
Creating functions for functionality
So our first step is to pull out and name all the functions. While we're at it, unlike pyxie, we'll split out the contents of what would normally be in a setup() and loop() in an arduino program.
#include <Servo.h>

int headlights_led_pin;

Servo leftwheel;
Servo rightwheel;

int leftwheel_pin;
int rightwheel_pin;

void forward() {
    leftwheel.write(180);
    rightwheel.write(180);
    delay(500);
}
void backward() {
    leftwheel.write(0);
    rightwheel.write(0);
    delay(500);
}
void left() {
    leftwheel.write(180);
    rightwheel.write(0);
    delay(500);
}
void right() {
    leftwheel.write(0);
    rightwheel.write(180);
    delay(500);
}
void stop() {
    leftwheel.write(0);
    rightwheel.write(0);
    delay(500);
}
void lights_on() {
    digitalWrite(headlights_led_pin, HIGH);
}
void lights_off() {
    digitalWrite(headlights_led_pin, LOW);
}

void setup() {
    leftwheel = Servo();
    rightwheel = Servo();
    headlights_led_pin = 13;
    leftwheel_pin = 2;
    rightwheel_pin = 3;

    pinMode(headlights_led_pin, OUTPUT);
    leftwheel.attach(leftwheel_pin);
    rightwheel.attach(rightwheel_pin);
    leftwheel.write(90);
    rightwheel.write(90);
}

void loop() {
    forward();
    right();
    backward();
    left();

    lights_on();
    delay(1000);
    lights_off();
    delay(1000);
}
Device abstraction for our robot
So the device abstraction layer for our device has the following signature:
void forward();
void backward();
void left();
void right();
void stop();
void lights_on();
void lights_off();
This is the what we need to build an IOT-Kit interface for.
Minimal IOT-Kit Interface
Our starting point for our IOT-Kit interface is something minimal. Initially we'll try to cover the following parts of our device abstraction:
void forward();
void stop();
void lights_on();
void lights_off();
We'll then add the rest in.
Changes to support minimal control API
We add the following include near the top of the file:
#include <CommandHostTiny.h>
In order to make our device introspectable and controllable, we need to add in a class which subclasses "CommandHostTiny".
The skeleton of this class looks like this:
class SimplebotHost : public CommandHostTiny {
private:
    char temp_str[128];   // needed for parsing input
    int lights;           // To store state of the headlight
public:
    SimplebotHost() : lights(0) { }
    ~SimplebotHost() { }

    const char *hostid(); // Returns the name of the device
    const char * attrs(); // Returns the list of attributes(+types) that can be changed
    const char * funcs(); // Returns the list of functions the device understands.

    bool has_help(char * name); // To allow us to find out whether a given name has help.

    void help(char * name); // Returns the help for a given name - usually a function
                            // Includes machine parsable type signature

    bool exists(char * attribute); // Returns true/false for an attribute existing.

    const char *get(char * attribute); // Gets the value for an attribute

    int set(char* attribute, char* raw_value); // Sets the value for attributes

    int callfunc(char* funcname, char* raw_args); // Calls the given function with given raw_args
};
So by way of example, hostid, attrs and funcs in this case look like this:
const char *hostid() {    return "simplebot";     }
const char * attrs() {    return "lights:int";    }
const char * funcs() {    return "forward,stop";  }
Note that the name returned as host id here - "simplebot" - is used as the name to advertise the robot on the network, and that is how this line of python is made to work:
from iotoy.local import simplebot
Help is implemented in two ways - firstly to note that help is available and then to return the help available:
bool has_help(char * name) {
    if (strcmp(name,"forward")==0) return true;
    if (strcmp(name,"stop")==0) return true;
    return false;
}

void help(char * name) {
    if (strcmp(name,"forward")==0) Serial.println(F("forward -> - Move forward for 1/2 second"));
    else if (strcmp(name,"stop")==0) Serial.println(F("stop -> - Stop moving"));
    else Serial.println(F("-"));
}
Attribute handling is then done as follows. Note we only have one attribute - lights. ANd here I choose to update the LED state whenever the lights value changes:
bool exists(char * attribute) {
    if (strcmp(attribute,"lights")==0) return true;
    return false;
}

const char *get(char * attribute) {
    if (strcmp(attribute,"lights")==0) {
        itoa (lights, temp_str, 10);
        return temp_str;
    }
    return "-";
}

int set(char* attribute, char* raw_value) {
    if (strcmp(attribute,"lights")==0) {
        int value = atoi(raw_value);
        lights = value;
        if (lights) {
            lights_on();
        } else {
            lights_off();
        }
        return 200;
    }
    return 404;
}
Handling function calls is pretty simple:
int callfunc(char* funcname, char* raw_args) {
    if (strcmp(funcname,"forward")==0) { forward(); return 200; }
    if (strcmp(funcname,"stop")==0) { backward(); return 200; }
    return 404;
}
IOT-kit final step
At this stage, the command host isn't being used.
Our final step in our transformation boils down to:
- Add the other functions from our device abstraction
- Move the setup for the robot into a setup function in the class
- Make sure that setup also sets up the command host
- Make the arduino set up set up our robot
- Remove the custom code from loop() and run the command host instead.
In practice this means that our final code looks like this:
#include <Servo.h>
#include <CommandHostTiny.h>

int headlights_led_pin;

Servo leftwheel;
Servo rightwheel;

int leftwheel_pin;
int rightwheel_pin;

void forward() {
    leftwheel.write(180);
    rightwheel.write(180);
    delay(500);
}
void backward() {
    leftwheel.write(0);
    rightwheel.write(0);
    delay(500);
}
void left() {
    leftwheel.write(180);
    rightwheel.write(0);
    delay(500);
}
void right() {
    leftwheel.write(0);
    rightwheel.write(180);
    delay(500);
}
void stop() {
    leftwheel.write(0);
    rightwheel.write(0);
    delay(500);
}
void lights_on() {
    digitalWrite(headlights_led_pin, HIGH);
}
void lights_off() {
    digitalWrite(headlights_led_pin, LOW);
}

class SimplebotHost : public CommandHostTiny {
private:

    char temp_str[128];
    int lights; //

public:
    SimplebotHost() : lights(0) { }
    ~SimplebotHost() { }

    const char *hostid() {    return "simplebot";     }
    const char * attrs() {    return "lights:int";    }
    const char * funcs() {    return "forward,backward,left,right,stop";  }

    bool has_help(char * name) {
        if (strcmp(name,"forward")==0) return true;
        if (strcmp(name,"backward")==0) return true;
        if (strcmp(name,"left")==0) return true;
        if (strcmp(name,"right")==0) return true;
        if (strcmp(name,"stop")==0) return true;
        return false;
    }

    void help(char * name) {
        if (strcmp(name,"forward")==0) Serial.println(F("forward -> - Move forward for 1/2 second"));
        else if (strcmp(name,"backward")==0) Serial.println(F("backward -> - Move backward for 1/2 second"));
        else if (strcmp(name,"left")==0) Serial.println(F("left -> - Spin left for 1/2 second"));
        else if (strcmp(name,"right")==0) Serial.println(F("right -> - Spin right for 1/2 second"));
        else if (strcmp(name,"stop")==0) Serial.println(F("stop -> - Stop moving"));
        else Serial.println(F("-"));
    }

    bool exists(char * attribute) {
        if (strcmp(attribute,"lights")==0) return true;
        return false;
    }

    const char *get(char * attribute) {
        if (strcmp(attribute,"lights")==0) {
            itoa (lights, temp_str, 10);
            return temp_str;
        }
        return "-";
    }

    int set(char* attribute, char* raw_value) {
        if (strcmp(attribute,"lights")==0) {
            int value = atoi(raw_value);
            lights = value;
            if (lights) {
                lights_on();
            } else {
                lights_off();
            }
            return 200;
        }
        return 404;
    }

    int callfunc(char* funcname, char* raw_args) {
        if (strcmp(funcname,"forward")==0) { forward(); return 200; }
        if (strcmp(funcname,"backward")==0) { backward(); return 200; }
        if (strcmp(funcname,"left")==0) { left(); return 200; }
        if (strcmp(funcname,"right")==0) { right(); return 200; }
        if (strcmp(funcname,"stop")==0) { backward(); return 200; }
        return 404;
    }

    void setup(void) {
        // Setup the pins
        CommandHostTiny::setup();

        leftwheel = Servo();
        rightwheel = Servo();
        headlights_led_pin = 13;
        leftwheel_pin = 2;
        rightwheel_pin = 3;

        leftwheel.attach(leftwheel_pin);
        rightwheel.attach(rightwheel_pin);
        leftwheel.write(90);
        rightwheel.write(90);

        pinMode(headlights_led_pin, OUTPUT);
    }
};

SimplebotHost MyCommandHost;

void setup()
{
    MyCommandHost.setup();
}

void loop() {
    MyCommandHost.run_host();
}
Final notes
So, that's a whistle stop tour of the device layer. The fun thing now: assuming this robot has a hardware serial bluetooth (ala the dagu mini), then this is everything you need to do as an arduino based maker to make your device an IOT-able device. If you're not using bluetooth, then your device assumes it's doing serial down a cable.
Either way though, as a device maker, this is all the changes you need to do to enable the python program we started with to be able to control your robot over a network.
I'll explain how this works in a later blog post, but I thought this would make a good fun first example about how IOT-Kit gets implemented by a device maker to enable a very high level of abstraction to take place.
Escaping The Panopticon of Things?
February 11, 2018 at 10:48 PM | categories: iotkit, python, iot, C++, definitions, iotoy, opinion | View CommentsThe Panopticon of Things
The Internet of Things. Ask 100 different people what it means to them and you get a 100 different answers. I know, because I have done... When you do, in my experience you some different versions and themes.
For many companies though, futurists, and techies it boils down to some variation of this:
- People have devices, which can detect things or have small amounts of processing power added
- These devices monitor their state or activity, or similar
- This is published on the internet via a central service
- This information can be aggregated and worked on, and often can be drilled into down to individual items
But is that really an internet of things? Let alone "The internet of things"? No, it's internet connected things that reports information about you, your environment or your activity to a centralised system. Some extend this to the idea of connecting these centralised systems to each other.
So no, they're not really an internet of things. They're a panopticon of things.
If you're doing this, stop and think. Do you really want to build a panopticon?
A Panopticon of Internet Connected Things
The idea of the panopticon is a relatively old idea. A panopticon was a building where all (pan-) the residents could be observed (-opticon). If that sounds a little creepy, consider it was originally meant as a design for a prison...
It's actually been implemented in both the real world and in fiction. In the real world, it's been implemented as prisons in a variety of places around the world... In fiction, the most recent mainstream "up-beat" example is the floating prison in Captain America Civil War. The most and well known realisation of the idea of turning the general world into a panopticon is in the world of "big brother" in 1984.
One key point: the purpose of the panopticon is NOT to benefit those staying in the panopticon. The purpose is to benefit the owner of the panopticon in some fashion.
This means that any panopticon of things is designed to benefit the person running the panopticon, not the person who owns the things (however well intentioned the maker was/is). Indeed, it can mean the panopticon views you and your things as a product to be sold (advertising, data, etc), not as customers to provide value to. This isn't be universally the case, but it's common enough.
I don't buy products to benefit some random company. Do you? I buy or use products either for my benefit or for the benefit of those I buy them for. Don't get me wrong, being able to opt-in can have benefits. Google maps being able to give you a different route based on real time data is useful.
But be clear - it's based on using data from a panopticon, built on internet connected things.
Obsolescence Really Means Junk
Internet connected things isn't really a new idea. That means we've now gone through the full product cycle more than once. Be it a Nabaztag, Mattel IM-ME, AIBO, or similar. I've picked these ones for a variety of reasons:
- They might have been acclaimed
- The manufacturer thought it was a "Big" thing, and mass produced them
- They seemed hackable and interesting
- They're all kinda fun or interesting from some angle, but aren't really now
They all relied on some form of central service, and as those services disappeared, they became less useful or in some cases instantly useless junk. I also picked them because they all had many active hacker groups work to make them useful for many years - often in ways the original manufacturers didn't consider.
For each of these, there are dozens of other active objects with similar issues. They all relied on some form of central service. They all became obsolete when the service they relied on to work disappeared. They all contained interesting tech.
These devices all became junk. The value was in the service, not in the device. Even though with all of these devices they had value to the owner, and could've retained value without the central service.
A Panopticon of Internet Connected Junk
So this is really what this sort of internet of things really means. Building a network of benefit to the owner of the network using devices that become useless when the owner decides to cease supporting the devices.
That means the creation of electrical junk, that is wasteful, and in the end of limited benefit to the customer.
Reframing the question.
Rather than ask "what is the internet of things", ask yourself - "What is the internet of my things?" "what should the internet of things be -- for me?". Or I could ask you "what is the Internet of Things of Yours" ?)
- Tracking of my "stuff"
- Monitoring and controlling my own devices which are networked
- Taking my networks at home and using them all in a unified manner
- Allowing my devices to work with each other.
- Using my data and devices in ways that benefit me, and those I get them for.
These are somewhat different answers. Similar, but different. They don't preclude working with panopticons. But they do take a different angle.
This reframed question is the reason behind:
- IOT-KIT - a toolkit for creating systems and experiences based around allowing you to control networked devices that you own.
- IOTOY - a set of protocol specifications enabling an "Internet Of Things Of Yours"
I'll be describing in a short series of posts:
- IOT-KIT and its motivation
- How to use IOT-KIT to make your own IOT devices that have longevity of value to the owner.
- IOTOY specifications
- Device layer
- Web Layer
- An overview of how this was implemented in the microbit prototype
- How to implement this in your own systems.
The core underlying ideas were:
-
Suppose you can make an arduino (or similar) based device. You should be able to make it an IOT-KIT based device trivially. (ie low barrier to entry)
-
Suppose you know very limited python, can you use and control the IOT devices that sit on your network. (Note, this allows you to then trigger behaviour between devices)
-
No "centre". Minimal standard interfaces making it normal for individuals, groups, companies and consortia to create their own domain specific standards. (Much like these days we use JSON, rather than centralised XML schemas for many services...)
-
Plan for "obsolescence means ongoing utilty". If your devices can continue to remain useful after the manufacturer disappears, then you build value, not junk.
These goals are effectively all designed for a low barrier to entry, while still inter-operating.
If you're interested, please like, share, comment or similar, and as always feedback welcome.
Pyxie 0.1.25 Released
February 09, 2018 at 07:54 PM | categories: python, subset, compilation, C++, microcontrollers | View CommentsI've made a new release of pyxie. Largely internal changes.
The focus of this release is the result of the independent intermediate node refactoring project I was undertaking. This was to transform the list oriented data structure for representing a "pure" intermediate form of code into a more stuctured/generalisable format.
The motivation behind this change was the realisation that implementation
of end user functions (ie def) would be very difficult with this more
structured approach.
The actual release notes (and source releases) are here:
- https://github.com/sparkslabs/pyxie/releases/tag/v0.1.25
Github repo:
- https://github.com/sparkslabs/pyxie
Package on PyPI:
- https://pypi.org/project/pyxie/
Also via PPA for Ubuntu:
- sudo add-apt-repository ppa:sparkslabs/packages
- sudo apt-get update
- apt-get install python-pyxie
What's new user facing
Before I dive into those changes, it's perhaps worth noting some of the other more minor changes, but are more noticeable from a user perspective.
- A collection of docs added in doc/
- A start on documenting the models used in Pyxie
- Licensing on pyxie's output. (Yes, it's what you want, but explicitly so)
- Some new examples focussed on specific aspects of language:
ifif-elsepassprintwhile-breakwhile-continue
- The arduin profile has been extended to support the
Adafruit_NeoPixellibrary neopixelexample added
Worth noting:
- While there is an example "simplest_function" it is not expected to compile yet
Neopixel example
This is quite nice, and so since it's perhaps more interesting I'm including a snapshot here:
#include <Adafruit_NeoPixel.h>

pin = 6
number_of_pixels = 16
delayval = 500

pixels = Adafruit_NeoPixel(number_of_pixels, pin, NEO_GRB + NEO_KHZ800)

pixels.begin()

while True:
    for i in range(number_of_pixels):
        pixels.setPixelColor(i, pixels.Color(0,150,0))
        pixels.show()
        delay(delayval)
Note: This reuses the fact that #include is a comment in python. It might change at somepoint to be more like this...
from Adafruit_NeoPixel import *
...since that's logically closer, but for now this is a pragmatic approach that works.
Rationale behind changes
Before this change, pyxie used the following data structures, and code phases when parsing, analysing, transforming and performing code generation.
These were not ideal:
- Code phase: Parser - read in the source, parsed it, and created a
data structure
- Data structure: pynodes - these represent the concrete python syntax, and are generated during the code generation phase. These are python objects in a class hierarchy. Once created they are analysed and placed into a context to analyse datatypes.
- Code phase: Analysis. - Analyses the code, and decorates the existing pynodes with type information to understand the programs data and data types. (does not create a new data structure).
- Transform phase: walks the pynode CST, and generates an intermediate
data structure intended to represent the program in the abstract
independent of the language used. An independent intermediate form
if you like.
- Data structure: independent intermediate form - This is used to model the program in a "pure form" - which isn't constrained by the source language, and contains enough information for the target language output to be generated. That was the theory. In practice it was a nested list of list of lists ... Not ideal. More on this below.
- Code generation phase: This walked the independent intermediate form (the lists of lists), and created an output data structure representing the concrete final program.
- The third/final data structure is intended to represent the final output language. ie it is intended to be a concrete representation of the output language. This final data structure is then capable of creating the output. Again, forms a hierarchy and could be called "CppNodes" (Though they weren't before this change)
The problem here is that while the pynodes are currently well defined (to a large extent) and that the CppNodes are pretty well defined (even if they could be better), the independent intermediate form sucked because it was just nested lists. This meant in practice the code was fragile, difficult to change, and increasingly difficult to work with. In the early days of Pyxie this simplistic structure made sense. However as data analysis becomes more complex and tricky. This mirrors the fact that the same was true in the early days of the parsing side.
So the focus of this sub-project was to replace the intermediate form, and tighten up the differences and make clearer in the code base that we have PyNodes, iiNodes, and CppNodes, where:
- Pynodes - are the current structures, unchanged - note these are currently prefixed Py - PyDefStatement for example.
- CppNodes - are map to objects/hierarchy/etc that represents C++ programs, but made clearer (slightly). These are now prefixed Cpp rather than the previous C_ which some of the objects use.
- iiNodes - represent the independent, intermediate nodes. Since iiNodes need to be used in source code where there are either PyNodes + iiNodes or CppNodes + iiNodes, they have the prefix "ii" enable differentiation.
Since all 3 of these are actually models, the code for these has all moved to sit below pyxie.models.
At some point there will be a need to restructure the code more generally. Parsing, transforming to IINodes and code generation are actually all transforms, and should sit together. That was out of scope for this already relatively major internal change.
Changelog
I could include the changelog, but if you're curious about that, check out the release notes mentioned above.
Future
I'm not going to put a timeline on this - I've made that mistake in the past for pet projects but the following goals exist for future iterations:
- Code structure:
- Consolidate the structure of CppNodes and make them "cleaner"
- Similar for iiNodes
- Shift type inference and variable detection from PyNodes to iiNodes
- Change iiNodes to be more ECS based
- Do the analysis/type inference in more of a visitor pattern (ala ECS)
- Types
- Better implement core datatypes to allow transforms
- Strings need implementing better
- Aim for closest match representation of datatypes
- Allow JSON type structures to exist
- Implement lists
- Implement dictionaries
- Implement tuples
- Language/structural
- def's with no arguments, and no local variables
- def's with arguments
- def's with local variables
- classes
- Example system goals:
- It should ideally be possible to run a perceptron style neural network on an Atmega 8A with the aim of making a robot that can follow a line based on said network.
The example system is deliberately ambitious/difficult - at least for a version of python compiled to C++ to run on such a small device.
Some parts of this will go quicker than others, and won't be done strictly in that order.
Most of it however relies upon better internal code structure. (When I started after all it wasn't clear that this would work or be a good approach, so used json objects throughout. As time goes on it becomes clearer that those ad-hoc structures are in the right sort of places, but could do with being more consistent to increase flexibility.
In order to keep releases interesting though, I'll try to add interesting examples at each stage :-)
As usual comments welcome - especially with regard to what examples you might find interesting.
Introducing Pyxie - A Little Python to C++ Compiler
August 05, 2015 at 09:14 PM | categories: python, subset, compilation, C++, microcontrollers | View CommentsOver the past several months during evenings and weekends I started work on a new python to C++ compiler -- called Pyxie (it's a play on words :). It's currently reached version 0.0.16, and is just beginning to be usable for vaguely fun things.
It's not intended to be a full implementation of python, but rather a "Little Python" that is simple enough to be compiled to C++. "Little Python" will be a well defined subset of python that can be compiled. The reason for this is to allow me to write code in python that compiles to run on embedded systems like Arduino, MSP430 and ARM mbed platforms.
This makes it different from Micropython - which runs a python interpreter on the microcontroller, and PyMite which effectively runs a simplified python VM. Both of those projects assume a device with more memory. Due to the constraints of these devices, the compiler is unlikely to ever support the entirety of the python language.
PLEASE NOTE It is not complete, and almost certainly won't do what you want, yet. If you're looking for a general python to C++ compiler - though not for arduino - take a look at ShedSkin. It is just beginning to be useful though for fun little things with an Arduino (or similar devices based on an Atmel Atmega 32U4), hence this post.
What job does it do?
Pyxie's job is to allow me to write python code, instead of C++ such that it runs on a microcontroller, and to do so efficiently. The reason I want this is to (eventually) use this with cubs and scouts.
- I quite like the idea of describing software in terms of the job it does. Since I came across the approach, I find it clarifies the purpose of a project dramatically.
Website
Pyxie has a site: http://www.sparkslabs.com/pyxie/
It's a work in progress and will become nicer and shinier as Pyxie itself gets nicer and shinier.
Release Schedule
There's no particular release schedule. I try not to have releases that are too large, or too far apart. What's planned to go into a release is done on a release by release basis. What actually has gone in is a reflection of what I've been up to in the evenings/weekends of any given week.
Name
The name is a play on words. Specifically, Python to C++ - can be py2cc or pycc. If you try pronouncing "pycc" it can be "pic", "py cc" or pyc-c". The final one leads to Pixie.
Target Functionality
The guiding principle is that Little Python should look and act like a version of python that was never written. (After all python 1.x, 2.0, 2.5, 3.x, 3.5 are all "python" but simply different iterations) You could almost say that Little Python should look like a simplified "ret-con" version of python.
At present a non-exhaustive high level list of things that are targetted are:
- Duck typing / lack of type declarations (but strong types)
- Whitespace for indentation
- Standard control structures (No else clauses on while/for :) )
- Standard built in types
- Lists and dictionaries
- Easy import/use of external functionality
- User functions (and associated scoping rules)
- Objects, Classes, Introspection, and limited __getattr__ / __setattr__
- Namespaces
- Exceptions
- PEP 255 style generators (ie original and simplest)
Quite a few of these may well be challenging in teeny tiny microcontroller environment, but they're worth targetting.
Status
So what DOES this do at the moment?
At present it supports a very simple subset of python:
- strings*, ints, boo leans, floats
- Variables - and typing via basic type inference
- while, for, if/elif/else
- Parenthised expressions
- Full expression support for ints
- For loops actually implement an iterator protocol under the hood
- The ability to pull in #include's using C++ preprocessor style directives - since they're automatically python comments
It also has 2 compilation profiles:
- Desktop/libc - that is for development and testing
- Arduino Leonardo - that includes things like DF Beetle/etc
This is a simple benchmark for a desktop:
countdown = 2147483647
print "COUNTING DOWN"
while countdown:
    countdown = countdown - 1

print "BLASTOFF"
(That "print" will become a python3 style print BTW - it's currently a python2 style statement while I'm bootstrapping the compiler!)
The arduino "blink" program for the leonardo profile:
led = 13

pinMode(led, OUTPUT)

while True:
  digitalWrite(led, HIGH)
  delay(1000)
  digitalWrite(led, LOW)
  delay(1000)
This is unlikely to ever be a completely general python to C++ compiler, especially in the context of a desktop machine. If you're after that, there are better options (shedskin and Cython spring to mind).
Where to get it -- Ubuntu 14.04LTS (trusty), 15.04 (vivid)
(This is the recommended mechanism)
I build packages for this in my PPA. You can install pyxie as follows -- add my PPA to your ubuntu, update and install the python-pyxie package.
sudo add-apt-repository ppa:sparkslabs/packages
sudo apt-get update
sudo apt-get install python-pyxie
This will automatically pull in the dependencies - PLY and guild
Where to get it -- PyPI
Simplest approach using PyPI:
sudo pip install pyxie
Alternatively go to the Pyxie page and download from there...
... and then do the usual sudo python setup.py install dance.
Dependencies
Uses David Beazeley's PLY package. Either use your package manager, or install from pypi:
At some later point in time the batch compiler will make use of guild - my actor library. That can be found here:
Usage - Default Profile
Given the following python file : benchmark.pyxie
countdown = 2147483647
print "COUNTING DOWN"
while countdown:
    countdown = countdown - 1

print "BLASTOFF"
You compile this as follows:
pyxie compile benchmark.pyxie
That compiles the file using the standard/default profile, and results in a binary (on linux at least) that can be run like this:
./benchmark
Usage - Arduino Profile
Given the following python file : arduino-blink.pyxie
led = 13

pinMode(led, OUTPUT)

while True:
  digitalWrite(led, HIGH)
  delay(1000)
  digitalWrite(led, LOW)
  delay(1000)
You compile this as follows:
pyxie --profile arduino compile arduino-blink.pyxie
That compiles the file using the arduino leonardo profile, and results in a hexfile called this:
arduino-blink.hex
Depending on your actual leondaro type device you can use AVRdude to load the code onto the device. If you're using a bare Atmel 32U4, you can use dfu-programmer to load that hexfile onto your device.
Usage - Summary
More generally:
pyxie -- A little python compiler
Usage:

    pyxie -- show runtime arguments
    pyxie --test run-tests -- Run all tests
    pyxie --test parse-tests -- Just run parse tests
    pyxie --test compile-tests -- Just run compile tests
    pyxie --test parse filename -- Parses a given test given a certain filename
    pyxie parse filename -- parses the given filename, outputs result to console
    pyxie analyse filename -- parses and analyse the given filename, outputs result to console
    pyxie codegen filename -- parses, analyse and generate code for the given filename, outputs result to console. Does not attempt compiling
    pyxie [--profile arduino] compile path/to/filename.suffix -- compiles the given file to path/to/filename
    pyxie [--profile arduino] compile path/to/filename.suffix  path/to/other/filename -- compiles the given file to the destination filename
Open Source
Pyxie is Copyright © 2015 Michael Sparks, and Licensed under the Apache 2 license. It's not public on github at the moment because the internals are still changing somewhat between releases. Once this has stablised I'll open up the git repo.
The code is however on github, so if you'd like early access, let me know. Obviously you can do what you like with the code from pypi within the reasonable limits of the apache 2 license!
It's developed entirely using my own kit/etc too so nothing to do with work. (I mention this primarily because during the Micro:bit project I also built a scrappy python to C++ compiler. That had all sorts of limitations, but made me think "If I was to redo this from scratch, I'd...". This project is a result of that thinking as a result, but as I say nothing to do with work!)
Release History
This is to give some idea of progress it's good (though obviously not swift) progress, with an average of a few weeks between releases. (Mainly because dev depends on spare time:)
- 0.0.1 - (rolled into 0.0.2 - Initial structure)
- 0.0.2 - supports basic assignment
- 0.0.3 - Ability to print & work with a small number of variables
- 0.0.4 - Mixed literals in print statements
- 0.0.5 - Core lexical analysis now matches language spec, including blocks
- 0.0.6 - Character Literals, "plus" expressions, build/test improvements
- 0.0.7 - Structural, testing improvements, infix operators expressions (+ - * / ) for integers, precdence fixes
- 0.0.8 - Internally switch over to using node objects for structure - resulting in better parsing of expressions with variables and better type inference.
- 0.0.9 - Grammar changed to be left, not right recursive. (Fixes precedence in un-bracketed expressions) Added standalone compilation mode - outputs binaries from python code.
- 0.0.10 - Analysis phase to make type inference work better. Lots of related changes. Implementation of expression statements.
- 0.0.11 - Function calls; inclusion of custom C++ headers; empty statements; language spec updates
- 0.0.12 - While loops, break/continue, Website, comparison operators, simple benchmark test
- 0.0.13 - if/elif/else,conditionals/boolean/parenthesised expressions.
- 0.0.14 - For loops implemented. Added clib code, C++ generator implementation, FOR loop style test harness, parsing and basic analysis of of FOR loops using a range interator
- 0.0.15 - clib converted to py clib for adding to build directory
- 0.0.16 - Adds initial Arduino LEONARDO support, improved function call, release build scripts
Supporting this
Please do! There's many ways you can help. Get in touch.
Summary
Pyxie is at an very early stage. It is a simple little python to C++ compiler is at a stage where it can start to be useful for some limited arduino style trinkets.
Kicking the tires, patches and feedback welcome.
Hello Microbit
March 28, 2015 at 07:38 PM | categories: C, microbit, arduino, BBC R&D, blockly, work, BBC, C++, microcontrollers, python, full stack., full stack.D, webdevelopment, mbed, kidscoding | View CommentsSo, a fluffy tech-lite blog on this. I've written a more comprehensive one, but I have to save that for another time. Anyway, I can't let this go without posting something on my personal blog. For me, I'll be relatively brief. (Much of this a copy and paste from the official BBC pages, the rest however is personal opinion etc)
Please note though, this is my personal blog. It doesn't represent BBC opinion or anyone else's opinion.
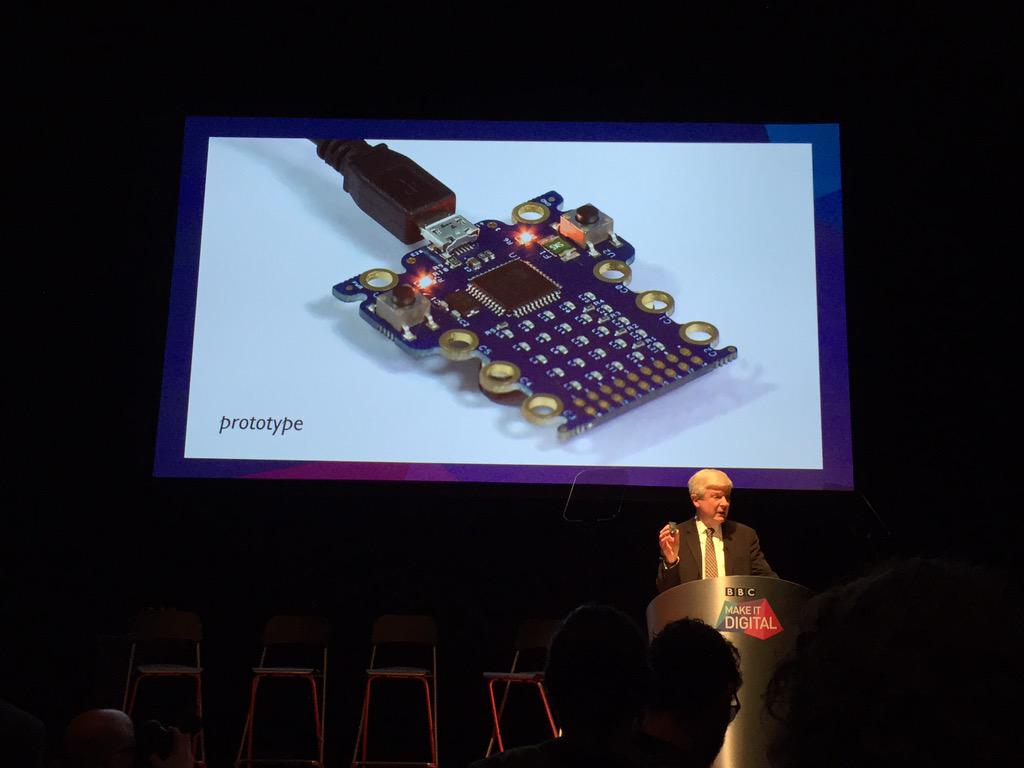
Just over 2 weeks ago, the BBC announced a small device currently nicknamed the BBC Micro Bit. At the launch event, they demonstrated a prototype device:
The official description of it is this:
BBC launches flagship UK-wide initiative to inspire a new generation with digital technology
The Micro Bit
A major BBC project, developed in pioneering partnership with over 25
organisations, will give a personal coding device free to every child in year 7 across the country - 1 million devices in total.
...
Still in development and nicknamed the Micro Bit,* it aims to give children an exciting and engaging introduction to coding, help them realise their early potential and, ultimately, put a new generation back in control of technology. It will be distributed nationwide from autumn 2015.... The Micro Bit will be a small, wearable device with an LED display that children can programme in a number of ways. It will be a standalone,
entry-level coding device that allows children to pick it up, plug it into a computer and start creating with it immediately.
...
the Micro Bit can even connect and communicate with these other devices, including Arduino, Galileo, Kano and Raspberry Pi, as well as other Micro Bits. This helps a child’s natural learning progression and gives them
even more ways of expressing their creativity.
...
Early feedback from teachers has shown that it encourages independent learning, gives pupils a strong sense of achievement, and can inspire those who are not usually interested in computers to be creative with it.
For me, the key points about the prototype:
- Targetted at children, and their support networks (teachers, parents etc). This is reflected throughout the system. It doesn't underestimate them though. (I work with cubs and scouts in my spare time, and I know they're much willing to try than adults - which means they can often achive more IMO. Especially at scout age)
- Small programmable fun device, instant feedback, with lots of expansion capability with a gentle gradual curve.
- Web based interfaces for coding, as well as offline interfaces
- Graphical, python or C++ code running on the device
- Designed to work well with other things and hook into larger eco-systems where there's lots of users.
(That's all public information, but for me those are really the key points)
Aside from the obvious -- why did the announcement excite me? Simple: While it wasn't my vision - it was Howard Baker's and Jo Claessen's, I implemented that Microbit prototype and system from scratch. While an earlier iteration had been built and used at events, I was asked to build a prototype we could test in schools and to take to partners to take to scale. (I couldn't work from that earlier iteration, but rather worked from the source - Howard and Jo. It was a harder route, but rewarding)
For those who recognise a similarity between this and Dresscode which I blogged about last summer, the similarities you see are co-incidental. (I was clearly on the same wavelength :-) ) While Microbit was in a early stage pre-prototype phase there, I hadn't seen it.
My thinking behind Dresscode though, was part of the reason I jumped at the chance to help out. It also mean though that some aspects I had a head start on though, and in particular, the IOToy and Guild toolsets I developed previously as part of some IOT work in R&D came in handy in building the prototype.(That and the fact I've used the arduino toolset a fair amount before)
Anyway, as I say, while I can't say much about the project, but it was probably the most intense development project I've worked on. Designing & building the hardware from scratch, through to small scale production manufacture in 3 months, concurrent with building the entire software stack to go with it - compilation toolchains, UIs and so on, AND concurrent with that was the development of detailed documentation and specs for partners to build upon. Intense.
In the last month of core development I was joined by 2 colleagues in R&D (Matt Brooks and Paul Golds) who took my spike implementations of web subsystems and fleshed them out and made them work the way Howard and Jo wanted, and the prototype hardware sanity checked and tweaked slightly by Lawrence Archard. There was still a month of development after that, so it was probably the most intense 4 months of development I've ever done. Well worth it though.
(Regarding names, project names change a lot. While I was building our device in even that short 3 months, it got renamed several times, and since! Don't read too much into names :-) Also, while it does fit anywhere else, it was Fiona Iglesias who was the project manager at the time who asked me if I could do this, and showed a great leap of faith and trust when I said "yes" :-) Balancing the agile process I needed to use against the BBC being very process driven (by necessity) was a thankless task!
Finally some closing things. On the day of the launch I posted a couple of photos in my twitter feed, which I'll repeat here.
The first was my way of going "yay". Note the smiley bit :-)
So, look what I made! http://t.co/OTCn14YN7s Earlier revs were built on my kitchen table :-) pic.twitter.com/2k9a2UBOZh
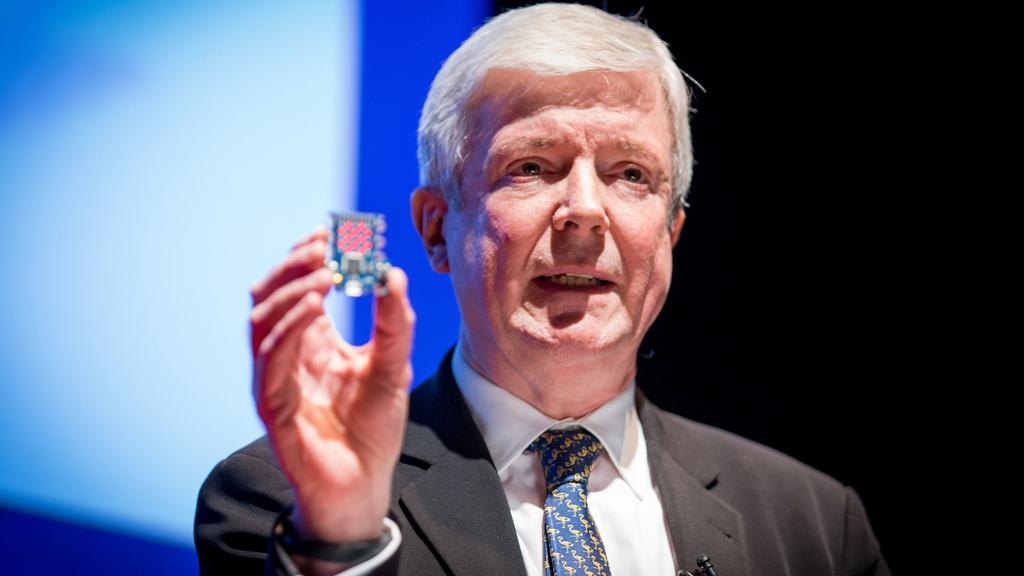
— Michael (@sparks_rd) March 12, 2015The second related to an earlier iteration:
Earlier iteration: pic.twitter.com/bmQ2G7KK2t
— Michael (@sparks_rd) March 12, 2015Anyway, exciting times.
What happens next? Dunno - I'm not one of the 25 partners :-)
The prototype is very careful about what technologies it uses under the hood, but then that's because I've got a long history of talking and writing about about why the BBC uses, improves and originates open source. I've not done so recently because I think that argument was won some time ago. The other reason is because actually leaving the door open to release as open source is part of my job spec.
What comes next depends on partners and BBC vagaries. Teach a child to code though, and they won't ever be constrained by a particular product's license, because they can build their own.
Anyway, the design does allow them to change the implementation to suit practicalities. I think Howard and Jo's vision however is in safe hands.
Once again, for anyone who missed it at the top though, this is a personal blog, from a personal viewpoint, and does not in anyway reflect BBC opinion (unless coincidentally :).
I just had to write something to go "Yay!" :-)
Why I'm watching the Commonwealth Games
July 24, 2014 at 10:42 PM | categories: people, python, IP Studio, javascript, bbc, C++, dayjob, CWG | View CommentsPeople don't talk enough about things that go well, and I think I'm guilty of that sometimes, so I'll talk about something nice. I spent today watching lots and lots the Commonwealth Games and also talking about the output too.
Not because I'm a sports person - far from it. But because the output itself - was the result of hard work by an amazing team at work paying off with results that on the surface look like ... "those are nice pictures".
The reality is so much more than that - much like they say a swan looks serene gliding across a lake ... while paddling madly. The pictures themselves - Ultra HD - or 4K are really neat - quite incredible - to look at. The video quality is pretty astounding, and given the data rates coming out of cameras it's amazing really that it's happening at all. By R&D standards the team working on this is quite large, in industry terms quite small - almost microscopic - which makes this no mean feat.
Consider for a moment the data rate involved at minimal raw data rate: 24 bits per pixel, 3840 x 2160 pixels per picture, 50 pictures per second. That's just shy of 10Gbit/s for raw data. We don't have just one such camera, but 4. The pixels themselves have to be encoded/decoded in real time, meaning 10Gbit/s in + whatever the encode rate - which for production purposes is around 1-1.2Gbit/s. So that's 45Gbit/s for capture. Then it's being stored as well, so that's 540Gbyte/hour - per camera - for the encoded versions - so 2TB per hour for all 4 cameras. (Or of that order if my numbers are wrong - ie an awful lot)
By itself that's an impressive feat really just to get that working in realtime, with hard realtime constraints.
However, we're not working with traditional broadcast kit - kit that's designed from the ground up with realtime constraints in mind and broadcast networks with realtime constraints in mind and systems with tight signalling for synchronisation. We're doing this with commodity computing kit over IP networks - albeit with ISP/carrier grade networking kit. The 4K cameras we use are connected to high end capture cards, and then the data is encoded using software encoders into something tractable (1.2Gbit/s data rate) to send around the network - to get the data into the IP world as quickly as possible.
This is distributed around the studio realtime core environment using multicast RTP. That means we can then have decoders, retransmitters, clean switchers, analysers, and so on all individually pick up the data they're interested in to do processing. This is in stark contrast to telling a video router matrix that you'd like some dedicated circuits from A to B - in that it's more flexible right out the box, and lower cost. The lower cost comes at the price of needing sufficient bandwidth.
At the edges of the realtime core we have stores that look for live audio/video/data and store them. We have services for transferring data (using DASH) from high speed storage on capture notes to lower speed cheaper storage.
It also means that production can happen whereever you extend your routing to for your studio. So for example, the audio mixing for the UHD work was not happening in Glasgow, but rather in London. The director/production gallery was in a different building from the commonwealth games themselves. The mix they produced was provided to another team for output over a test/experimental DVB-T output. Furthermore it goes to some purely IP based recievers in a some homes which are part of a test environment.
As well as this, each and every site that recieves the data feeds can (and did) produce their own local mixes. Since this IS an experimental system doing something quite hard we have naturally had some software, hardware and network related issues. However, when we ceased recieving the "mix" from their clean switch output from glasgow we were able to route round and pick up the feeds directly locally. Scaling that up rather than having a London feed and regional opt-outs during big TV events (telethons etc), each of the regions could take over their local broadcast, and pull in the best of all the other regions, including London. Whether they would, I don't know. But this approach means that they could.
While the data/video being shipped itself is remarkable, what is doing the processing, and shipping is in many respects even more remarkable - it's a completely rebuilt broadcast infrastructure from the ground up. It provides significantly increased flexibility, with reduced cost with "just" more upfront costs at development time.
If that wasn't enough, every single aspect of the system is controllable from any site. The reason for this is each box on the network is a node. Each node runs a bunch of "processors" which are connected via shared memory segments, forming arbitrary pipelines sharing raw binary data and JSON structure metadata. All these processors on each node are made available as RESTful resources allowing complete network configuration and control of the entire system. So that means everything from vision mixing/data routing, system configuration, and so on gets done inside a browser. System builds are automated, and debian packages built via continuous integration servers. The whole thing is built using a mix of C++, Python and Javascript, and the result?
"Pretty nice pictures"
And that is really, the aim. Personally, I think 4K is pretty stunning and if you want a look, you should. If you're in the BBC in Salford, come and have a look.
So why am I posting this though? I don't normally talk about the day job here - that should really normally be on the BBC blog or similar really. It's because I made a facebook post bigging up my colleagues at work in the context of this, so I'll finish on that.
Basically, I joined the IP Studio team (from one R&D team to another) 2 1/2 years ago. At that time many of the things I mention above were a pipe dream - and since that time I've touched many parts of the system, only to have them ripped out and replaced with newer better ways of doing things. Over that time frame I've learnt loads, worked with great people, and pretty humbled by everyone on the team for different reason.
If you ever feel "am I the only one to suffer from imposter syndrome", the answer is no. Indeed, I think it's a good thing - it means you're lucky to be working with great people. If you're ever upset at someone pointing at your code - which when you wrote it you were dead proud of - and saying "That's a hideous awful mess" then you're missing the point - if someone isn't saying that your codebase can't improve. After all I've yet to meet anyone who looks at old code of theirs and doesn't think it's a hideous awful mess. Most people are just too polite to mention it.
However, just for one moment, let's just consider the simple elegance of the system - every capture device publishing to the network. Every display device subscribes to the network. Everything is network controllable. The entire system is distributed to where is best for them to work, and built using largely commodity kit. The upshot? A completely reinvented studio infrastructure that is fit for and native to a purely IP based world, while still working for modern broadcast too. Why wouldn't I have imposter syndrome? The team is doing amazing things, and that really means every individual is doing amazing things.
And yes, THAT song from the Lego movie springs to mind to me too.
Normal cynicism will be resumed in a later post :-)
(Oh, and as usual, bear in mind that while I'm referring to work stuff, I'm obviously a) missing things out b) not speaking for the BBC c) simplifying some of the practical issues, and don't try and pretend this is in anyway official please. Now where's that asscovering close tag - ah here it is -> )